The following information is my sort of my basic guide on how to prune a bonsai tree for beginners.
It is designed for those of you who have nursery stock or over grown pre-bonsai or maybe something you’ve grown from seed and has been sat for a while and is now out of control.
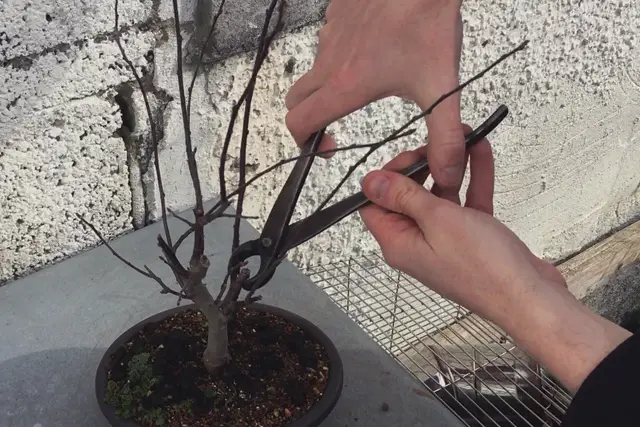
Basically if you’ve got a bushy mess in front of you and you are trying to work out where to start pruning, this guide should help you and show you the 7 steps I would take when pruning any bonsai.
I will actually tell you what you need to prune and why, not just say some generic “prune to shape” type nonsense.
Page Contents
Pruning A Bonsai Isn’t Always The Same As Styling A Bonsai
This also isn’t a styling guide and although aspects of this are very similar to styling, I would consider this guide more of a general practice on how to get your tree into a state that it will soon be ready to style.
If you did nothing else, apart from follow did these 7 steps for a few years, your tree will really start to develop quite quickly, but it will still need styling.
Pruning will get you a rough shape, styling will just refine that shape.
When Should You Prune Your Bonsai?
Deciding when you should prune a tree depends on a number of things, so we will save that for an article, which you can read here – When Should You Prune Your Bonsai?
Although, in short I would advise these techniques should be undertaken at least once a year and I’d recommend that late winter is a good time to perform them. The tree will be dormant, but it will be waking up and growing again very soon, so it can start to recover from your work.
The 7 Steps To Prune A Bonsai
Here are the 7 steps/techniques I use to prune any bonsai.
I will show you them here in this table, then I will go through them properly. Some of the explanations are a bit long, but I need to give you as much detail as possible so you know what to actually do, so take your time reading though this all, to make sure you understand the concepts of each technique.
| 1 | “Cleaning Out” A Bonsai |
| 2 | Only Have One Branch Coming Out Of The Trunk At One Place |
| 3 | Branches Are Only Allowed To Split Into Two |
| 4 | Clean Out The Branch Crotches |
| 5 | Trim Back To 2 or 3 Leaf Nodes |
| 6 | Remove Bar Branches |
| 7 | Remove Crossing Branches |
Just take your time and work though each one at a time. The first few times you prune a tree it can take a while, but that is okay. It is better to take your time than rush it and mess it up.
The more you prune, the faster you will get at processing everything and making your decisions.
These Are The Only Steps You Need
You will hear people talk about maintenance pruning, light or hard pruning, pruning to shape, initial pruning …put any word in front of pruning, it doesn’t matter, the 7 steps is all you will ever need.
no matter what you are trying to achieve, or what stage of development your tree is in …you will be using one of these 7 steps. Some types of pruning may require you do more of one step than another, but it doesn’t matter.
If you learn these 7 steps you can prune any bonsai, at any stage. So bookmark this page and learn each step properly and you will be set up for life.
(You can read more about – Frequently Asked Questions About – Pruning Your Bonsai)
1. “Cleaning Out” A Bonsai
This is a term you will hear quite lot in the bonsai world. But what does it actually mean? Well, nothing is actually being cleaned, it would probably make more sense to call it “Clearing Out”.
Cleaning out a bonsai means going in and removing the old leaves or needles and generally anything that is dead. It is especially important to remove the leaves that are closer to the trunk. This is more important for evergreen trees, but it still applies to deciduous too.
When you look at a full size tree they don’t have leaves on the trunk. They also don’t have leaves on the primary and secondary branches, the leaves are all found and the outer extremities, right at the tips
When you clean out this type of inner foliage in a younger tree, it instantly makes the tree look much older. It also cleans up the branch structure so it can be seen more clearly, making the next pruning steps easier to do as you can see what is happening.
This “cleaning” process also helps if you want to add wire, as the branches are now free from extra leaves getting in the way.
The clean up also includes pruning away any dead branches or twigs. They usually add no value, so they should be removed.
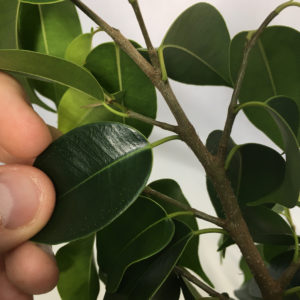
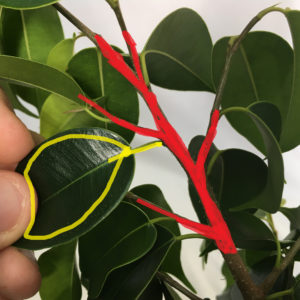
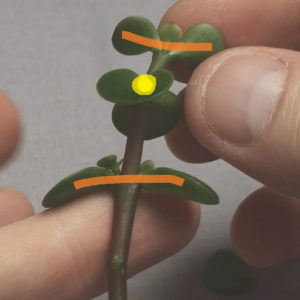
In the picture above you can see that there are leaves along the main branch (circled in yellow) on my ficus. That would be a strange place to find a leaf on a full size tree, so I go in and remove anything like this and “clean up” the tree.
This step is not really pruning anything, but something as simple as this can really improve a tree.
2. Only Have One Branch Coming Out Of The Trunk At One Place
This step actually overlaps with styling techniques. In short, you only want to have one branch coming out of the main trunk at any one point on your bonsai.
If you have two right next to each other, or very close, you should probably remove one.
This is where paying attention to the whole tree is important. If you find two branches like this, you will need to study both branches and decide which one is going to be best to remove.
Don’t rush into this decision. You also need to be brave and ask yourself if you should keep both. The textbooks would tell you that keeping both will cause a swelling in that area, resulting in inverse taper.
This is true. But sometimes rules need to be ignored. 99% of the time it will make sense to remove one of these extra branches, but just be aware that there will be that one time where it makes more sense to keep it.
The tree may only have these two branches and maybe the inverse taper is a feature? Who knows?
Just think long and hard about what you want to do. If you are new to this, or just unsure, then just leave this step for now. Finish the other steps and then come back and evaluate which branch you think is best to keep or remove.
I would prefer if you took 2 weeks to decide and then be happy with your choice, than make a snap decision and regret cutting a branch off.
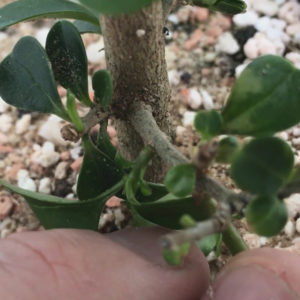
In the picture above these two branches are very close, they are pretty much growing at the same spot. One of them needs to go, but at the minute they are both small.
I can take my time to decide which one is better. It will also depend on what other branches are near by. If I look at the tree as a whole, I will see what one needs to go.
You will probably find you only need to do this technique once. Once the main structure is set, you will probably not get many new branches forming from the trunk, but you never know, some can still grow.
3. Branches Are Only Allowed To Split Into Two
Once you have a single primary branch coming out of the trunk on your bonsai, you want this branch to then split into two at any point along it.
Everywhere the branch splits, you only want it to split into two more branches.
When branches split like this, it is called ramification, the more divisions along the branch, the better. However, this only looks good if everything splits into two as the branch spreads out.
You will often find that tree splits into three or four branches at one point. Sometimes this may work and you can leave it, but the majority of the time you will want to remove the extra branches and be only be left with two divisions at any one point.
This is mainly due to the fact that anywhere where there is more than two branches, it can result in swelling and cause your branch to have unsightly inverse taper.
The next logical question when faced with 3 or 4 branches in one area is “what branches do I cut and what ones do I keep?”
Part of this will be answered below when I explain how far to cut back and how to use directional pruning, but a good rule of thumb is you want your branches to flow outwards and away from the tree.
If you have a branch growing straight up or down, it just won’t have that natural outward flow. It won’t feel right, so I’d say to get rid of those.
However, you may find times when the up or down facing branches may be advantageous. Basically you’ve always got to ask yourself what’s going to happen next? Where is the tree going to grow next? And then plan ahead to where you want the growth to happen.
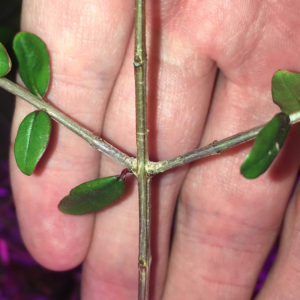
If you look at the picture above you will see the branch comes up and then splits into 3. This looks bad now and is only going to get worse as the area where all 3 meet will swell and cause inverse taper. When you have a situation like this you need to look at what is going to be best.
Depending on what is going on around this branch, I would probably remove the left or right branch. Imagine I removed the left one, since to the left there is another good branch …then I would be left with the Middle and Right branch. This now means the branch comes up and splits into two, which is perfect.
If all goes to plan these two branches should send out more shoots and I would repeat the same process on these two branches next years, meaning I now have 4 branches. If you keep doing this over and over again, you will get a very ramified tree with lots of divisions.
(You can read more about – How Do You Build Ramification On A Bonsai?)
4. Clean Out The Branch Crotches
This is very similar to the above and could almost be the same thing to be honest. You usually find further back on the branches, rather than just the ends of the branch.
Once you go back a few weeks later to examine your great work of only having two branches at any one point, you sometimes gets advantageous shoots pop up in the crotches of the branch divisions.
These are often in the branch divisions closer to the trunk. You will easily notice them as there will be 2 strong branches and a 3rd smaller unwanted shoot.
Just remove these extra shoots. They are no use to anyone.
Many people remove these in the “Branches Only Allowed to Split Into 2” step. It doesn’t really matter when you do it; so long as you are aware of them and aware they can pop up from time to time, you can just remove them when you see them.

If you are finding this article useful you should also check out my YouTube Channel, I post new video’s every Sunday.
I like to show each of my Bonsai trees journey throughout the year in a sort of time lapse, along with some tips and techniques throughout the video.
5. Trim Back To 2 or 3 Leaf Nodes
This step is where you actual shorten the branches you are wanting to keep and develop. If your tree has been left unchecked or has come from a nursery, you may have long branches that will need to be shortened.
You should cut these back but depending on the species or what you are trying to achieve, the amount you cut back may vary.
As a general rule. You should cut back to the 2nd or 3rd set of leaves. It doesn’t matter if you are just “pruning the tips” in some sort of light prune, or giving the tree a hard prune …you will be cutting back to 2 or 3 nodes on each branch and letting the tree develop from there.
What Is A Leaf Node?
A leaf node just means a spot where a leaf is growing, or has grown. At the base of any leaf, you will find a node, which is basically an area where a new shoot can grow from.
When you cut a branch back, the leaf node just below where you have made your cut will be activated and start growing a new branch from this spot.
Different Leaf Patterns On Bonsai Trees Are Important For Pruning
It’s important to study your leaf formation for this technique as it can determine your decision on what nodes to cut back to.
Some trees have leaves that come out in an Alternative pattern. One on the left, then a little further on, the leaf will come out on the right. Then left again, then right, and so on all the way up the branch.
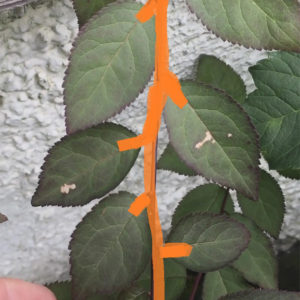
On some trees the leaves will be in opposite pairs, but they can come out in two different ways.
They will either have two leaves come out opposite each other at the same spot on the branch and this will continue all the way along the branch or they will alternate their direction as they go along the branch.
If they alternate their directions they will still come out in pairs at the same spot, but the next pair of leaves will then be at a 90 degree angle from the other pair, pointing front to back as you look at it.
The opposite leaves will alternate all the way up the branch like this.
Choosing A Leaf Node To Cut Back To
Understanding how your tree grows and its leaf pattern is very important for working out how far back you should cut a branch.
When you cut a branch back you will find that the nodes below the cut point will be the ones that swell and form new branches. You can use this information to your advantage in a massive way when trying to develop a tree as you can predict where a new branch will form.
This is what you may have heard as ‘directional pruning’ it’s hard to describe and is easier to see on video and even easier to understand in person.
I would ask you to go out and look at all sorts of different trees. Get the branches in your hands. Look at how the leaves grow long branches and imagine cutting them at certain points and try to imagine how a future shoot may grow.
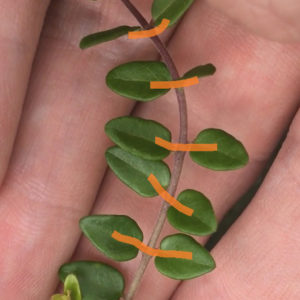
When you cut back a branch with opposite leaves, the leaf below the cut point is where the first new branch will form. It will also very often form a new branch at the leaf below this too. So you will find you get two new branches, one going to the left and one going to the right.
When you cut back opposite pattern leaves, the pair of leaves below the cut will form two new branches from this spot, so the new shoots will be side by side as such.
Once you learn this and can predict where the new shoots will come from, this can help you to decide where to cut back to.
If you want a new branch to go to the left you can prune accordingly and cut back to a leaf that is pointing in that direction. The tree will respond with a new branch growing to the left.
Obviously wire can sort most things out, but if you can get a branch to go naturally in the general direction you want, it will make your life a lot easier in the long run as you will not need to wire it.
Why Not Go Back To The 1st Leaf Node?
When you realise you can predict where new branches will come from after pruning, you will understand why its good to prune trees back and make them much shorter. You can can easily start to build up ramification very easily.
However, you may have noticed that I said cut back to the 2nd or 3rd node and I’m sure some of you have asked, why not cut back to the first node?
If the aim of the game is to get ramification and short internode lengths, then surely it makes sense to cut back as far as possible and start the dividing even closer to the trunk? Well. Yes. Sometimes that works. But sometime doing this is a bit of a disaster.
This is a hard skill to learn, you really need to know the growth habits of your tree.
I’ve found that on certain trees that cutting back to one set of buds doesn’t work. Initial it looks fine and even when the new shoots come, it looks perfect. However, with growth comes girth.
You will find the primary branch and the two divided shoots grow and thicken …but they thicken to point where they kind of merge into one.
Have you ever heard the term cankle? Apparently that’s when people ankles and calf sort of mere into one when they get too big. Apologies for the terrible term and comparison, but it helps imagine what’s happening quite well.
When this happens in your tree, you will see a primary branch dividing into a shorter secondary branch that looks perfect, but once its grows, it gets lost.
The small space between the primary branch and the divide gets swallowed up in the swelling and your good work is lost and replaced with what looks like some poor pruning. You can explain to people all you want, all they are going to see if two branches coming from the same spot.
Now there is times when you can get away with this. Sometimes the distance between the primary branch and the first bud is big enough that it works and allows for swelling and growth.
This is why you need to study your trees growth habits and maybe you need to experiment a bit too.
Some buds are going to be obviously too close and the gap far too small, when you look at it you will just know it’s not going to work. Other time’s you might not be too sure. I would say give it a go. Take the chance.
If you do fall victim to the swelling and lose your secondary branching, you can just remove one of the two new branches and start a again. A minor setback in exchange for a priceless piece of knowledge that you can use to make sure it doesn’t happen again in future.
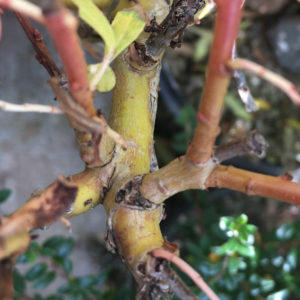
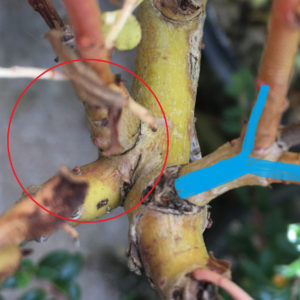
The blue is area is where I’ve pruned to 2 or 3 nodes and it now looks great. (both pruned at the same time)
In the picture above you can see on the left where I pruned back to the first leaf node. Two branches came from here and have now both swollen and merged to look like they are coming from the main trunk itself.
The branch on the right was cut back to the 2nd node, where it has of course divided too. However, you can see there is enough space between the trunk and the division, so it actually looks like 1 branch dividing into 2, which is actually what you want.
Just stick to the 2nd and 3rd nodes, then your future branching wont look awful.
(I would also say that these two branches are going to keep growing and so will the trunk …soon it will look like they are both coming from the same spot, so this would go back to rule 2 (Only Have One Branch Coming Out Of The Trunk At One Place). I imagine in the next couple of prunings one of these branches will be removed, probably the one of the left)
6. Remove Bar Branches
This is a pruning technique that can have a big effect on your bonsai tree. Bar branches are where two branches come out on the trunk at the same point, but on the opposite side of the trunk.
So from certain angles it may look like a T or a ‘like the two branches forming a ‘bar’ across the trunk. These are unwanted for a couple of reasons.
In the styling side of things they can be seen to confuse a viewers eye. When someone follows a trunk line up a tree from the base, having a bar branch can upset the natural elegant flow of the trunk.
However, more commonly they are deemed bad as they can cause swelling in the area.
Branches cause the trunk to swell at the point where they join. Normally this is fine but as there are two branches near each other they will both thicken the trunk at this point, where it will become much thicker than an area where there is only one branch.
This in turn will cause inverse taper, which can often ruin the look of a tree.
The easiest way to deal with bar branching is to remove one.
However this is not a light decision. I’ve had trees where there are only 4 branches. And well they are both bar branches, meaning to remove them, means I will lose half of the tree.
Sometimes you just have to go for it and sometimes you just need to bend the rules and live with the consequences.
Just take your time deciding. Weigh up what each branch has to offer and what it will do to the tree if it’s removed.
If you tree is young it will probably grow more branches and it’s probably best to be brave and remove any bar branches. If your tree is well formed and to remove a branch would lose most of its design, maybe you can live with it?
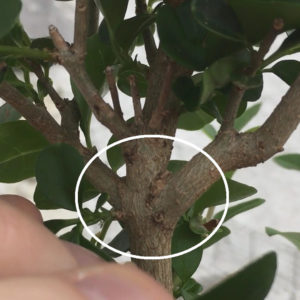
In the picture you can see there is a bar branch that is starting to cause inverse tape in this area. Really I need to remove one. The left hand branch seems smaller and probably less developed, so upon inspecting the tree as a whole, this might be the sensible one to remove.
7. Remove Crossing Branches
One you’ve cleaned everything out and cut everything back and your left with a basic structure it’s good to just look over the tree as a whole and see how all the branches look as a whole tree.
You may find some branches are growing into one another. Sometimes a simple bit of wire or some directional pruning will get rid of this issue.
However, Sometime the two branches will be crossing which can just look bad. You may have to remove a branch that grows inwards or crosses over other branches and the trunk.
Sometimes branches grow inwards or just in a weird direction. Branches like this are usually easy to spot when you sit back and look at the tree. They just seem in the way or just generally wrong.
You should find that when they are removed the tree looks less cluttered and untidy.
If we go slightly into the styling world of bonsai, a tree should flow outwards from the trunk. There shouldn’t be any inward growth or any unnatural straight up or down growth, which will also upset that natural outward flow.
I find taking a picture of a tree and looking at it helps you spot these. You will see the crossing branches straight away in a picture, they will just stand out and you will know what needs to be removed.
You Can Prune A Bonsai In Any Order
The 7 steps I show above do not need to be taken in any particular order. Although, I would suggest you do the “cleaning” phase first, then after that you can do it in any order.
In fact some times you might not need to do a particular step, or you can delay it until another time. You should look at the tree as a whole and make your pruning decisions based on how it will affect the overall picture you always want to think holistically.
In general these techniques work for most trees, but not all of them. I would ask you research your individual tree species to ensure you can perform these techniques safely.
(I have guides for the individual species that I own – Here)
Take Your Time Pruning
At first all these techniques can be daunting. Just work through the list one at a time and take it slowly.
Eventually you will be able to merge them into one big task and do them all at once.
It’s like driving a car. When you where learning you would just spent 30 minutes doing only clutch control, now you can change gears while doing 3 other things at once. The same is true for these pruning techniques.
Just work on as many trees as you can and soon you will feel confident pruning a tree and slowly taking it one step closer to being a great bonsai.
(If you are beginner you you should also read – Beginner Bonsai Advice)
Repeating These Steps Over and Over Again
You may have also heard people say ‘the tree has styled itself’ which will sort of happen if you just repeat these steps over and over again for many years.
If you take a nursery plant or grow your own material and do these techniques for a few years, you will find that you have yourself a wonderful piece of ‘raw material’.
You will find that the tree does almost styles itself. You will be left with a tree that is almost styled without doing any styling. So when you do come to add wire and what not, the tree will have already shown you where it wants to go as such.
Some bonsai styling videos you see online use trees that have undergone these pruning steps for years before the video starts.
This is why they only have to do a quick bit of pruning and wiring and by the end of the video they have something awesome. The tree hasn’t been made in 30 minutes. It’s been made over the last 5-10 years with 30 minutes of excitement at the end.
I think it’s important for beginners to know that this is how bonsai is made. It can’t be done instantly. You need to prepare a tree over time so that when you finally style it, it’s able to be styled.
(You can read more about – Can You Make An “Instant” Bonsai?)
Is Trunk Chopping Pruning?
Trunk chopping is a form of pruning, but it is more about building the trunk and main structure.
The idea is that you grow your tree really large so that the trunk will thicken. Once it is at the size you want, you cut it right back so that really all that is left is the trunk and it will look like a stump.
From this stump you then grow out new branches. Once these branches are long, you would use the above 7 techniques on them to start to developing these branches.
(You can read more about – How To Trunk Chop A Bonsai)
Conclusion
So those where the 7 techniques I use to prune my trees. Sorry it was long, but hopefully it helps and clearly shows you what you need to do.
If you watch any professional do a styling video they will be using these techniques. They may do it super fast, or in a different order. Maybe they call it something else, or do them all at the same time, but they will be using them all at some point.
Try and watch some videos and see if you can notice any of the steps I’ve mentioned above.
(You can also read about How To Heal Wounds after pruning, as that is always good to know, as well as Pruning Aftercare Advice For Your Bonsai)

Hi, I’m Ian. I have been doing bonsai since 2014. I created this site to spread all the knowledge I have acquired over the years. Don’t forget to check out my Youtube videos where I show the progress of my own Bonsai each week or connect with me on social media.
You can read more about me and how I got into Bonsai on the About Page


